 Today’s post began where so many of our posts seem to originate: The Recycling Bin
What you need:
Empty aluminum beverage cans
Scissors
Sandpaper (sanding block is helpful but not necessary, or wrap sandpaper around a bit of wood)
Pen or pencil
Ribbon or cord for hanging
- Start with an aluminum drink can.

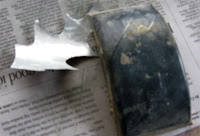
- Cut off the top and bottom with scissors. (Wear gloves and glasses to be extra safe.) A knife is good to make the first cut so you can get your scissors in there. Cut down the side–if you haven’t done so already to get the top and bottom off–and flatten it out.

- Trace your object. I like leaves, but you could use a drawing or just freehand it. (Snowflakes? Fruit? Use your imagination.) Bear down with your pencil or ballpoint or other pointy thing so you make a cutting line.

- Cut along the lines. Be careful. Cut aluminum is sharp.
-
With your pointy thing and using your object as a reference, whether it is a leaf like mine or what-have-you, emboss your cut-out with veins, other details, etc. Take a nail and make a hole for hanging the ornament.
-
Sand the piece to remove any burrs and other hazards and to give it a nice pewtery surface. A sanding block or its equivalent is handy for this. I sanded the front and back. If you prefer, you can sand the color off entirely, but I left it for a distressed look. The veins or other details are emphasized by the sanding so you want to make sure you emboss before you sand for this effect.


- Add a ribbon, cord, or a length of raffia to hang it up. That’s it.
T.L.

This is pretty cool looking. Thanks so much for sharing. I’m a fledgling crafter, and always looking for something easy and interesting.
Awesome..Makes nice ornaments…can never go wrong with nature.
Thanks, Kc. Nature knows.
aluminium can ornaments
do u trace the design or draw it out and what pen/marking do u use
cecilia wolfe–I trace the design, but you can draw it if you prefer. A ball point pen, especially one with no ink, is a good choice for marking.
Absolutely love these, but need to know: Do you do anything to the edges to make them less sharp? (thinking about grandkids wanting to touch them on the Christmas tree…)
Colleen–I give them an all-over with a sanding block to distress them a little and take off any burrs. If you are concerned do a trial one perhaps with rounded edges and see what you think. They aren’t as lethal as they look. I keep any questionable ornaments above kid-height on the tree.
I saved this link last year and finally tried it out and love it. I made cute Christmas ornaments.
http://howtodosomething.blogspot.com/2009/12/how-to-make-ornaments-out-of-pop-cans.html
I love it! I featured your project in my Friday Finds post this week. Great reuse project! Thank you for sharing
I was just paging through the Oct/Nov 2010 Birds & Blooms magazine and they have a one-page “Leaf Ornaments” feature showing this EXACT project, using 3 of the EXACT same photos. Did you submit this idea to them or did they possibly plagiarize your work? Seemed quite puzzling to me since this post was on 12/11/2008. Hopefully they did it honestly!
Fear not. they hired us.
Fabulous! I don’t drink soda, but I just walked by a pepsi can while walking the dog and was thinking what can I do with this! Now i know.
Kathy
Amazing! And so simple!